The main problem arises when you notice the temperature of the CPU is rising too often. Now, there’s no fixed reason behind this. Although, some of the common issues have mostly interfered in this situation. A detailed discussion is mentioned later in this article. Despite the reasons, it’s always a wise decision to check the actual temperature of your CPU. In this way, you’ll be easily able to look at what is causing the issue and counter it. Fortunately, there are two different methods to look at the temperature of your CPU. One doesn’t include any fancy resources other than the BIOS. The second method will require some additional software that’ll do the task efficiently. Both of these methods have their own pros and cons. Thus, it’s up to you and your needs, what to pick for. Let’s jump in to look at the first method.
How to Check CPU Temperature From BIOS/UEFI
Starting the method that doesn’t require any third party softwares or other fancy resources. The BIOS or UEFI is everything you’ll need here. The methods mentioned below are applicable to the recent Windows version. and they might slightly differ from your OS versions. So let’s jump into the steps to know the temperature of your computer.
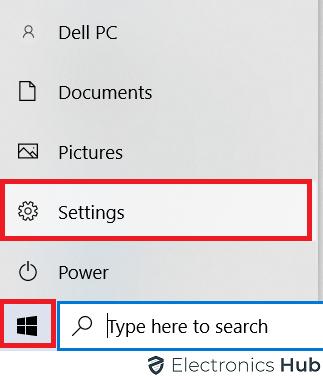
Open the Windows Taskbar from the Start Menu of your computer. There’ll be a “white gear” icon resembling settings menu. Click on it, and a new index and a search bar will appear under the Windows Settings header.
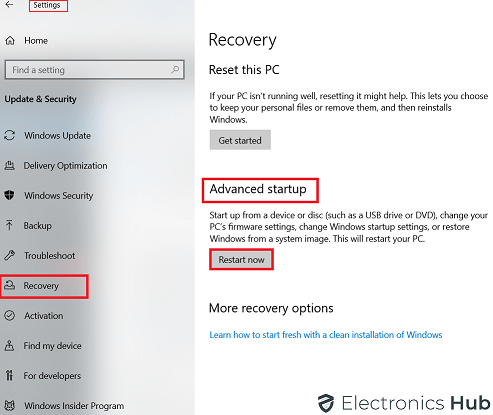
You’ll see the Update and Recovery tab at the bottom of the Windows Setting index and follow the next step.
Now, select the Recovery Tab in the left sidebar. A new sidebar will appear from there. Again in the bottom, there will be the Advanced startup heading. Select the Restart Now button. Your computer will undergo the Restart process. Don’t interfere with the computer during this movement.
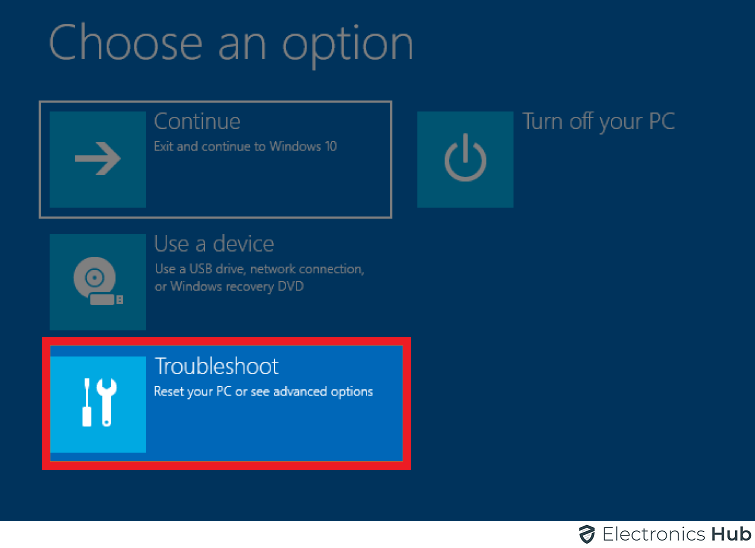
Select the Troubleshoot button in the beginning of the Starting Windows.
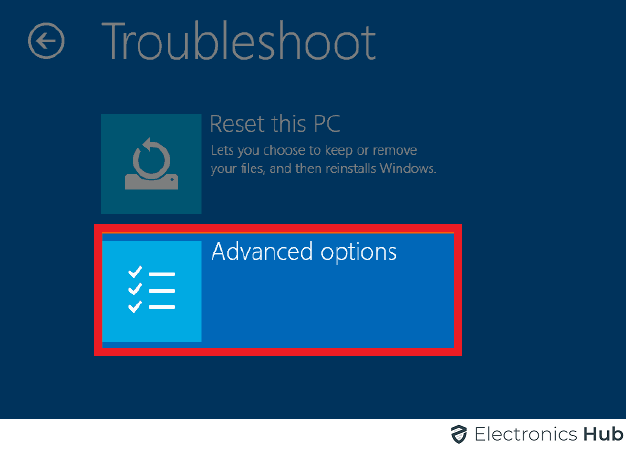
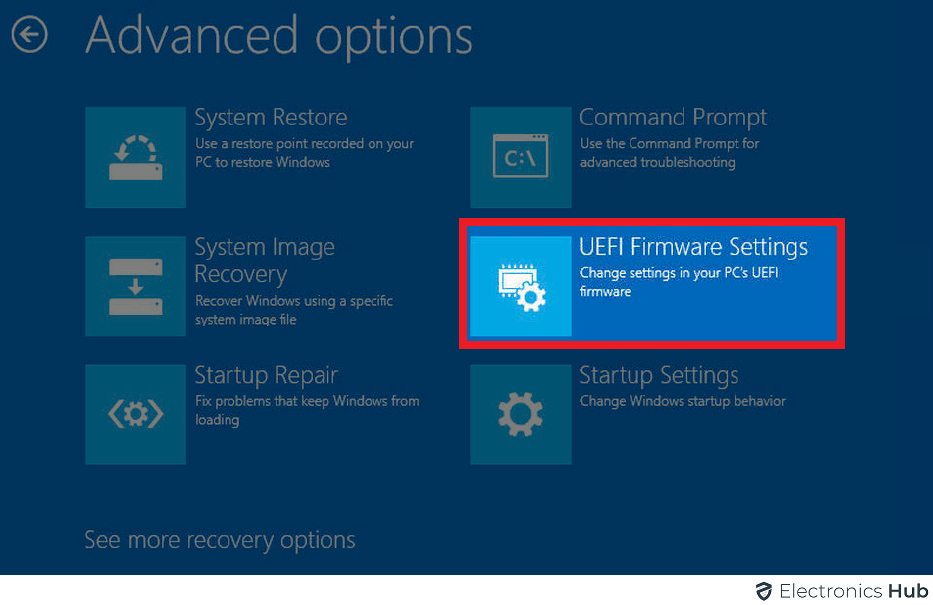
Choose the Advanced options button over there. All the other important settings such as system and startup settings are present here.
After the smooth starting, you’ll see the BIOS / UEFI interface. It’ll also include CPU temperature readout as well.
At last, select the restart button for the final step.
Advantages
Using the BIOS method for monitoring the temperature is obvious. You’ll not have to rely on something else except the built-in features of your PC only. Thus, you’ll not have to worry about downloading other software and dealing with their formalities as well. It includes login credentials that you’ll add for the software logging up process. Needless to say, your vital billing information will also be saved here. At last, the potential threat of accidentally downloading any virus or malware will also get eradicated. Another great reason for using this method would be if you already use BIOS or UEFI for any existing work. In this way, it’ll be easier for the CPU to integrate the temperature monitoring system into the existing BIOS interface. If you’re someone having an old model PC, then this would be the perfect fit for you, as the CPU will not have to worry about managing additional software.
Disadvantages
There are some visible disadvantages to this method. The first one among them is that it’s too time-consuming. From the beginning to the end process, there’re many steps to be taken that are too precise. Also, during the whole time, you’ll have to restart the PC twice. And this is everything you’ll want to check the temperature of your CPU. Looking more realistically, you should have a bit of the nerd’s brain at the beginning to go through all the processes. Or you might spend time finding solutions to the obstacles that will come on the way. Another major limitation here is you’ll not get the reason behind the rising temperature of your CPU. Here, you’ll only get the static numbers that too for one time. Thus, this method is only good if you’re too curious about the temperature of your CPU, and nothing else.
Monitor CPU Temperature with the Software
It’s time to look at decent software solutions to monitor the CPU temperature after the BIOS/UEFI method. After considering all the pros and cons of the previous method, using a third-party solution might be the best pick for you. However, it would be stupid to ignore the cons they might provide you with. The majority of this software takes help from the in-built digital thermal sensors to display accurate temperatures. Here, you’ll get more user-friendly monitoring but at the cost of extra space and probably a bit of investment too. This option becomes more viable if you’re using a computer for professional usage. You can continuously monitor the temperature rise at the moment you work with different programs. The paid ones even provide you with better interactions and options as well. Although, there are still some decent considerations that are free. Let’s look at the advantages of using this software first.
Advantages
The most prior advantage of using this software is, you’ll get accurate live temperature monitoring. Having a better idea of what’s causing so much heat is always better if you’re a busy computer user. Also, in this way you can easily take measures to slow down the temperature rise. Thus, ensuring the best health of your CPU.
Disadvantages
The most prominent disadvantage of using third-party software is the investment. The ones that aren’t free will charge recurring money every month for real-time heat monitoring. Another potential risk of using this software is the accidental downloading of viruses or malware. Make sure, you’re downloading them from legit and authority sites only. Also, do your complete research before concluding. If the investment isn’t the issue with you, there’s nothing much to worry about. This temperature monitoring software doesn’t take much space and will not utilize much CPU either.
Some of the Suggestions
Looking for some legit suggestions that’ll accurately measure your CPU’s heat? Here’s a list of the five. Some of them are paid and some are free, compare them and make your choice.
CoreTemp– Only asks for donations and nothing else. The customization is great here, especially for the developers. You can even add your features here. HWMonitor– Offers both free and paid support according to your needs. HWiNFO– One of the best free solutions available on the internet. It’s easy to set things up here and provide easy-to-see visuals. NZXT Cam– Most preferred by the gamers. Their support is top-notch and also will help you with in-game temperature monitoring as well. Open Hardware Monitor– It’s a great open-source solution that’ll provide an easy interface with praisable customizations.
What is the Ideal CPU Temperature?
Although there are some numbers to consider, the ideal CPU temperature solely depends on your computing habits. If you’re using your computer for general usage, you’ll not even have to think about the temperature issue. However, if you’re someone who uses almost the maximum capacity of the CPU, most of the time you’ll have to deal with the hot CPU cases. Here’s a golden rule to look for. It’ll also help you to constantly monitor the safety zone.
The average CPU temperature should not exceed over 140°F (60°C). This is the usual line from where you’ll start experiencing the heat of the CPU. Anything below this isn’t an issue at all. Next to temperature range lies up to 160°F (70°C) to 195°F (90°C). Most of the time, it’s the burden you’ve caused by hefty computing. Anything above 195°F (90°C) is a serious threat. Your computer hardware is bearing too much at this time. And it’s highly advisable to stop working and turn off the computer as soon as possible. Give some time to cool things up before switching on the computer.
Why is the Main Reason Behind My CPU Overheating?
Generally, the most logical reason behind the CPU overheating is when it bears too much load. Playing high-graphic games for continuous hours, using multiple programs at once are the most common reasons behind that. However, there are several other reasons besides too much stress and overclocking. And these are-
Weak hardware components. You might’ve bought your computer a long ago that has become weaker as compared to the demands of recent technologies. Try using your computer only with optimum loads only if you’re not willing to invest in a hardware upgrade. The physical environment of your computer. A poorly ventilated area is one of the most ignored reasons behind the CPU overheating. Make sure, you’re not having one. There should be enough space for better airflow. The same goes with the dust as well. Your computer components should always be clean for efficient life. Maybe your laptop is too sleeky. Oftentimes, stylish and aesthetic laptops are not good with the heat sink. As there’s not much room for airflow, you’ll have to limit your computing needs here.
Tips for Minimizing the Temperature Issues
The most common reason behind the high-temperature issue of the computer is extraordinary usage. You’ll have to take down every passive application working there. This includes any third-party app working in the background, downloading hefty files, and of course the antivirus continuously monitoring every activity. Try to pick one task at a time, and make a schedule around it. Doing so will help your computer a lot in managing all the work. At the same time, make sure the workplace and all the computer units are dust-free and clean. Maintaining this habit will surely increase the life of your computer. If you really can’t help with your hefty computing needs, you might change some external parameters. A great way of reducing heat generation is by adding another cooling system. The hack will work best especially during hardcore gaming sessions. On the other hand, you can reallocate some of the belongings of your desktop table to pass the heat easily. Else, try elevating the CPU for better airflow. Oftentimes, it’s the virus or the malware that causes so much heat. There are chances the malware is working all the time in the background causing too much stress to the CPU. You should check whether everything is okay here or not.
Be Careful When Overclocking, It Can be Dangerous.
Overclocking is like a double-edged sword that will provide you with utmost computer speed but can also harm it. Let’s consider an example to make things crystal clear. The human muscles are capable of lifting heavy loads such as four-wheelers. It’s only our brain that limits us from doing such activities. And there’s a big reason behind this. There’s a higher chance that our muscles will be brutally torn after indulging in these situations. Thus, it’s always better to work below the maximum capacity. The same thing goes with the overclocking as well. You’ll notice, the responsiveness and the processing speed have increased by a notable difference. But what if you’re lacking with the most recent hardware upgrades? Or your laptop isn’t capable of taking such a load continuously. Moreover, overclocking is also known for producing a lot of heat during the process. Thus, your machine will have to deal with one of the biggest enemies all the time. Make sure, you’re well-equipped hardware that is good with heat sink ability. Even for the most recent models, overclocking is a process that’ll cause a lot of stress it. So cross-check you have got a good reason to opt for computer overclocking.
Conclusion
Monitoring the CPU temperature will surely give you an edge over your computing experience. It’ll also increase the life of your computer drastically. Knowing what’s causing too much load and when to take measures against it is something every PC user should have. We hope the information mentioned above will help you to solve the issue you’re facing. Using software seems to be more convenient for anyone in the long run. If you’re in doubt to invest a monthly bill, try the free options first. There’re higher chances your needs will be easily satisfied with them. Comment * Name * Email * Website
Δ
![]()
![]()
![]()


![]()
![]()

